Friday, November 29, 2013

Turkey Breast of Wonder (Slow Cooker)


If you want a turkey breast that is cooked and not dry, this is the recipe for you.  I have always enjoyed the dark meat more than the white meat on a fowl, because of the darker pieces were juicy and tender.  The breast is always dry and yes, I love it but can only take it in spurts.  I have now found a recipe that eliminates the dryness of the turkey breast.  

Turkey Breast of Wonder:

Ingredients:

One 5-6 pound turkey breast ( make sure it fits in your slow cooker)
Package of onion soup mix
1/2 cup of chicken broth
1 can of whole cranberry sauce


The first thing you will want to do is remove the turkey breast from the packaging and wash really well.  Usually there is a giblet package, remove that as well. Cut off any excess skin on the breast and place this in your slow cooker.  


Put the cranberry sauce, the onion soup mix and the chicken broth together.  


Mix really well.


Pour over the turkey and cook on low for about 8 hours.


Check to make sure that it is thoroughly done. Your thermometer should read 180 degrees.  

I lost track of time and left mine in for 9 hours and the thermometer read about 200 degrees.  I knew I defiantly wasn't going to get food poisoning but I was really concerned that I may have ruined it.  

I couldn't even take the breast out of the pot whole.  This turned out so tender, the meat was just following off of the bone.  

I made gravy with the stock that was left in the pot, by adding mixed cornstarch and cold water to the boiling pot of stock and stirring until the stock thicken up.  

This is worth giving a try.  

Enjoy,

Debra

Adapted from the recipes of: http://jamiecooksitup.net/2012/05/turkey-breast-of-wonder-crock-pot/

Thursday, November 28, 2013

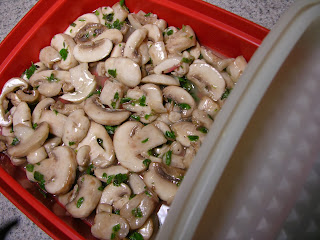
Marinated Mushrooms


Happy Thanksgiving Everyone!!!!!

I will be sharing quite a few recipes for the next four day.

I love this Holiday, it's a day to be thankful for all that I have and a starting of the Christmas Season.

On Thanksgiving I spend the day cooking, eating, listening to music watching marathon TV shows,  and putting up the Christmas tree, (and that means just putting it up, it takes me a week of placement and getting the branches ready, and did I mention eating?

Then the next three days are spent sharing my recipes, old and new, and wrapping presents for gifts that need to be mailed, and of course enjoying the company of family and friends.  I might as well say family, because my dearest of friends are my family.

It's a day for me to reflect on all the wonderful things that I am so blessed to receive.  I know most have huge gatherings, but I like the solitude and spending the day with my God and feeling blessed.

On that note, my first recipe to share is marinated mushrooms.

Ingredients:

12 oz of mushrooms (trim the caps and slice)
3 tablespoons of fresh oregano cut
2 tablespoons of lemon juice
2 tablespoons of white wine vinegar
4 tablespoons of olive oil


Here we go:

Add the white wine vinegar, lemon juice, and oregano in a bowl and whisk this together.  


Add the olive oil and whisk and whisk and whisk until it emulsifies.  


Pour this over the mushroom and mix really well.  Let this sit for about 20 minutes and mix every 5 minutes or so.  


Place in a sealed container.  I put mine in a tupperware container that is used for marinating. Place in the refrigerator and mix every so often.  With my tupperware, I just have to flip the container and the marinated mixture slowly drips on the mushrooms distributing it evenly.  


I make this the night before so it has plenty of time to marinate.  

This is a great side dish with a tangy punch, not to mention fresh.  

Adapted from the recipes of Martha Stewart http://www.marthastewart.com/337821/marinated-mushrooms

Blessings,

Debra

Monday, November 25, 2013

Giveaway


Don't forget about the giveaway.  One lucky person will be drawn in a raffle for a thirty-one utility tote.


a Rafflecopter giveaway


Ebay Store


I love retro, problem is, I have way to many collections to get them done in a life time.

If you are looking for retro/vintage craft patterns, kits, clothing and accessories, this is the place to possibly find what you are looking for!!!


Crochet Patterns


Saturday, November 23, 2013

Crochet Plastic Bottle Cap Baubles


What a wonderful day approaching, overcast skies, a chill in the air, drizzling rain. Time to pull out the wine glasses, cuddle with the pups under the comforters, and make crochet plastic bottle cap baubles.

I have a lot of  ideas brewing this morning for crochet bottle caps, and I want to get this basic crochet bauble out there, so that in the future I can lead you to this page for upcoming patterns without re-posting the basics.

These are really cute with buttons sewn on each side to use as a small gift tag or ornament.

Here is the basic pattern:

Supplies Needed:

1 plastic bottle cap 

4 ply yarn of  your color choice 

F/5 3.75mm Hook

The pattern I am giving is basic and you will need to modify the rounds based on the size of the cap.  The cap I am using is a standard soda bottle cap.

This is in American Standard Terms.

Ch = Chain
Rnd = Round
Sc = single crochet
YO = yarn over

Here we go:

Ch 2
Rnd 1:   Sc in the second chain from hook (5 times), do not join (5 sc)
Rnd 2:   2 sc in each sc from the previous round (5 times), do not join (10 sc)
Rnd 3:   2 sc in each sc from the previous round (10 times), do not join (20 sc)
Rnd 4:   1 sc in each sc from the previous round (20 times), do not join (20 sc)
Rnd 5:   1 sc in each sc from the previous round (20 times), do not join (20 sc)

At this point, test and make sure that the crochet rounds you have made cover the outside of the bottle cap.  Place the cap inside the crochet rounds you have made. You should see only the opening to the bottle cap.  If you are using a smaller bottle cap, you may need to only do one round of 20 single crochet.  If you are using a larger bottle cap you may need to do another round or two of 20 single crochets.  Just make sure that when you place the bottle cap inside of your crochet rounds that the last round you completed goes up to the top rim or just a little over the rim on the cap. 

Now to decrease:

Rnd 6:   Place the hook through the next sc, yo, pull through, place your hook through the next sc, yo and                  pull through, you should have three stitches on your hook, now yo and pull through all three stitches.              You will need to do this 9 more times for a total of 10 sc decreases. 

At this point, when looking at your work, you are starting to form a ball, go ahead and place your cap into this ball with the rim at the top of your last crocheted round. 

Then what I do is I fill the inside of the cap with scrap yarn cuttings that have been treated with lavender linen spray.  This is optional, but it puts out a fresh scent and it also keeps any moths or fiber eating bugs away.  If you opt to do this, go up to the top where my, search this blog is, and type in, linen spray.  This will give you the mixture I use. I just soak my scrap yarn cuttings in a little bit of this and let them dry out in an enclosed container.  You could use any scents that you like.  I just don't like bugs all that much. 

Rnd 7:   Once you have the cap inside the ball that you have made, with or without the yarn scarps, you will continue to decrease until closed and then fasten off and weave your yarns in.  Usually this is about 5 more sc decreases. 


For me today is going to be spent covering plastic bottle caps.  It's a great way to use up scrap yarns and I love to fill vases with fresh flowers, by cutting off the top of a plastic water bottle and placing this in the vase and then filling the crochet bottle caps along the sides.  Wow, talk about a running sentence.....


Enjoy,  

Debra


Wednesday, November 20, 2013

Giveaway - Owl Utility Tote made by thirty one


I have a giveaway!!!!!

Whoooo doesn't love owls?

This is a thirty-one medium utility tote and measures 10"H x 18"W x 9.5"D. Also included is the cover with a clear plastic top so you know whats in that tote.

I use mine for so many things.  Great for holding your yarn stash, using as a shopping tote, weekend trips, craft supplies. I could go on and on but I would be here all day.

This bag also collapses when not in use, for easy storage.

You can earn up to 5 entries and increase your odds for the drawing. At the end of the giveaway an entry point will be randomly drawn.

This giveaway  ends December 3, 2013.

You will be contacted within 24 hours by email after the contest ends if one of your numbers is randomly pulled.  Of course, I will post the results.


a Rafflecopter giveaway


Owl be hooting for you,

Debra


Tuesday, November 19, 2013

Pizza Monkey Bread


Ingredients:

2 cans of Home Style Biscuit Dough (each can is an 8 count)
1 to 2 cups of mozzarella cheese
2 cups of toppings (I used 1/2 cup of each: Canadian bacon, black olives, onion, and green pepper, all chopped) Use your favorite topping, even if it is only one, just as long as it is 2 cups of topping.
Marinara Sauce (1 cup or so)
4 tablespoon of butter
1 tablespoon of Italian Seasoning
1/2 teaspoon of garlic salt


Here we go:

First thing you want to do is preheat your oven to 400 degrees and oil your bundt pan down.

Melt your butter down and add the Italian Seasoning and the garlic salt to the butter and mix well.


Line up all your ingredients so you can do this in an assembly type of order and it goes more smoothly.

Line up the cheese, marinara sauce, toppings, butter mixture and your bundt pan.

I leave one can of the biscuit in the fridge until ready to use.  I find that they separate better when cold.

Open the can of biscuits and on the side of each biscuit you should see a seam and gently pull that open to make a pocket.  I just use my finger, but a knife can help as well.


Put in a pinch of cheese, then a heaping teaspoon of marinara sauce, a total of 4 pinches of toppings, (so if you are only using one topping, you will need 4 pinch, I'm using 4 toppings so I did a pinch of each one), and then another pinch of cheese.


Seal the biscuit by pinching together.  Make sure it is sealed really well.


Dip the biscuit into the butter mixture.


Place the biscuit into the bundt pan, seam side up.


Bake for 35 minutes or until they are golden brown.

Remove and let them rest in the bundt pan for about 5 minutes.

Turn the bundt pan onto a plate and they should fall right out.

I dip mine in Marinara sauces and they are scrumdiddlyumptious.

I like to use them for lunches, even cold they are good.


Adapted from the recipe of: http://www.quickfoodrecipes.org/pizza-monkey-bread/

Enjoy,

Debra


Monday, November 18, 2013

Vintage Crochet Cross Pattern


I am pleased to offer a vintage crochet Cross pattern.

You can work this in a multitude of colors to fit any theme or individual preference.  This would be really pretty work with beads as well.

You can find this pattern here:


https://www.etsy.com/listing/169705516/vintage-crochet-cross-bookmark-pattern


Tonight is Monkey Pizza.  Be sure and get your marinara sauce ready.

Enjoy,

Debra

Sunday, November 17, 2013

Crochet Slipper Boots for my Daughter


This is what I have worked on all day.  Designing a pair of boot slippers for my Daughter.  I'm liking them, but I'm just not sure about the trim along the back.  Should I keep it the way it is, run it all the way down, or completely remove it?

She had asked for slipper a few weeks back and I kept experimenting but just didn't like what I was coming up with.  I turned it into a boot.  Buttons would be cute along the side as well, but she asked for trim. so I'll stick with that.

After it is all said and done, I think I am going to make me a pair, they are very comfortable.  Or hey, I can just make another one of these and keep them.  Hopefully she'll ask for different colors.

So much you could do with these.  Instead of trim, add button, pom poms, flowers.

I am thinking I should write a pattern up for them with as many hours as I put into designing them, but sometimes I just like to give out one of kind gifts and let it go.

This is one of those, I am going to let go and just make a set for the kiddo.  

Maybe someone will see some inspiration!!!

Debra

Saturday, November 16, 2013

Marinara Sauce


I have two upcoming recipes that require Marinara Sauce, so I thought I would give this a whirl, and make my own. 

Here is the recipe:

Marinara Sauce:

2 tablespoons of olive oil
2 clove of garlic (minced)
1 28 ounce can of crushed tomatoes
2 tablespoons of tomato paste
2 tablespoons of fresh basil
1 tablespoon of fresh oregano
1 1/2 teaspoons of sugar
1 teaspoon of crushed red pepper


Grab a medium size sauce pan and with medium heat, brown the minced garlic.  This will take about two minutes.  


Add the rest of the ingredients and mix really well.  


Bring this to a boil and then turn your heat down to low and simmer for about 10 minutes.  While it is simmering, be sure and stir frequently.  

This will make approximately 3 cups.  

I placed mine in a bowl and covered so I can let it sit in the refrigerator for the day, while I pull my other recipes together.  I had to dip a little bread to try it out and it is, oh, so very good. 

It should be even better as these flavors marinate together for the day.  

I could dip bread in this all day.  


Enjoy,

Debra


Tuesday, November 12, 2013

Crochet Bottle Cap Turkey Pattern


Ready for Thanksgiving?  

Here is a pattern for a crochet bottle cap turkey.  

I'm going to run a fuzzy stick along the back and use them as napkin rings.  They would look cute as a brooch, or fridge magnet.  If you get to frustrated making the tail, use a silk autumn maple leaf, that would be cute as well.  Use small googly eyes instead of beads.

Supplies Needed:

1 bottle cap - I used a regular soda pop bottle cap
4 ply yarn - I used a variegated scrap yarn for covering the bottle cap and scraps of yellow, red, orange and brown for the feathers and legs, 
F/5 3.75mm Hook

The pattern I am giving is basic and you will need to modify the rounds based on the size of the cap.  The cap I am using is a standard soda bottle cap.

This is in American Standard Terms.

Ch = Chain
Rnd = Round
Sc = single crochet
YO = yarn over


Here we go:

Body:
Ch 2
Rnd 1:   Sc in the second chain from hook (5 times), do not join (5 sc)
Rnd 2:   2 sc in each sc from the previous round (5 times), do not join (10 sc)
Rnd 3:   2 sc in each sc from the previous round (10 times), do not join (20 sc)
Rnd 4:   1 sc in each sc from the previous round (20 times), do not join (20 sc)
Rnd 5:   1 sc in each sc from the previous round (20 times), do not join (20 sc)

At this point, test and make sure that the crochet rounds you have made cover the outside of the bottle cap.  Place the cap inside the crochet rounds you have made. You should see only the opening to the bottle cap.  If you are using a smaller bottle cap, you may need to only do one round of 20 single crochet.  If you are using a larger bottle cap you may need to do another round or two of 20 single crochets.  Just make sure that when you place the bottle cap inside of your crochet rounds that the last round you completed goes up to the top rim or just a little over the rim on the cap. 

Now to decrease:

Rnd 6:   Place the hook through the next sc, yo, pull through, place your hook through the next sc, yo and pull through, you should have three stitches on your hook, now yo and pull through all three stitches. You will need to do this 9 more times for a total of 10 sc decreases. 

At this point, when looking at your work, you are starting to form a ball, go ahead and place your cap into this ball with the rim at the top of your last crocheted round. 

Rnd 7:   Once you have the cap inside the ball that you have made, with or without the yarn scarps, you will continue to decrease until closed. Fasten off and weave in ends.  

Tail Feathers:

These are made with picots:  I put mine in the order of yellow, red, orange and brown.  This is personal preference, maybe you want to use completely different colors, or you don't want to have as many layers. 

On the side of the cap, there is usually about 2 rounds of post.  

You will want to put your hook through one of the post on the side of the cap, and slip stitch, then chain 3, and slip stitch back into where you made your first slip stitch.  Then just work along the side to the next post and repeat until you have the width of the tail that pleases you.  I completed 7.  Fasten off and weave in ends.  

You will continue to do this with each color, working behind the previous color on the post, but increase your chains, (for the red I did 5, for the orange I did 9 and for the brown I did 12).  My last two colors were worked more on the back of the bottle cap, if you find this happening to you, then just stay in line with your very first row made.  

You might find that you want to fan the tail out more and make the 2 back rows wider or you just want the feathers to be taller, all personal preference.  

This would also look cute by make the tail using a loop stitch, something to consider!!!

Beck:
0
With yellow leave a little bit of a tail for for sewing the beck onto the bottle cap and chain 3, sc in second ch from hook, and sc in next ch, ch 1 and turn, sc into the sc, fasten off and leave a tail long enough for sewing into the bottom of the cap.  

Wattle:

Attach the red yarn with a sl  underneath the beck on one of the side post and ch 4, second chain from the hook you will sl, ch 3, and sl back into where you made your first sl.  Repeat this with the next 2 ch.  Sl into where you made your sl into the side underneath the beck, fasten off and weave in ends.  

Eyes:

Attach two beads or wiggly eyes.  

Legs: (make 2)

Using yellow yarn attach with a slip stitch to the bottom back of the bottle cap.  Chain 13, sl into the 4th chain from hook, ch 3, sl into the same sl as previous sl, ch 3, sl into the same sl as previous sl, fasten off and weave in ends.    

Enjoy,

Debra


Monday, November 11, 2013

Vintage Crochet/Crocheted Lantern Bag Pattern Has Arrived


Vintage Crocheted Lantern Bag Pattern PDF File
Buy Now $3.99 USD


It was such a delight to make this vintage lantern bag.  

 think it would be really cute in matching colors to compliment a prom or wedding dress.  Small enough to not interfere with your social event, yet big enough to hold those necessitities for the evening.  

I am going to use mine for weekend trips.  It will be perfect for holding my toiletries, not mention cute sitting on the bathroom counter in the hotel.  

Better yet,I might just do one with plarn and use it as a snack/lunch bag.  

When purchased this comes to you as a PDF pattern will be emailed within 24 hours, once payment clears.   

This pattern is scanned and reimaged into a PDF file format from my original collection of public domain books. 

In most cases, the patterns can be difficult to follow and if necessary, I have crocheted the product and then added typed comprehensible details in red to better assist you with doing what you do best, crocheting!!!

I have taken away the agony of you spending time to find a match in yarn or thread, by giving a comparable yarn/thread and hook size that are now obselete.

You can sell products made from this pattern. 

Please, do not copy, distribute, or resell this pattern.

My re-image and photographs have my own copyright.

Preserving our history of crochet designers.
Enjoy,

Debra


Monday, November 4, 2013

Polka Dot Dress Necklace


I've been so preoccupied that I didn't realize that my Daughter has put out a new creation.  Several weeks back she had asked if I could send her some of her childhood dresses.  Three to be exact.  Above is her in one of the dresses.

I struggled with it for several weeks until I finally put them in a box and mailed them.  I had such a hard time letting them go.  Sad part is, they were in a closet and were only looked at every couple of years, if that.

I came in and posted the No Bake Oatmeal Cookies and I noticed she had an update.  When I opened her blog to see what she was up to, it literally took my breath away.  

I am no longer sad that I let the dresses go.  I am also very happy that she is incorporating some fibre with her metal arts. 

I immediately had to text and ask if she had any of the material left to make me a brooch.

I am very excited that she said yes.  Now I get to have a part of her past and a part of her future that I can wear, or maybe use as an ornament on the tree.  

Hopefully, one day, she may even want to learn how to crochet.  I do feel that need to hand it down.  

Isn't it stunning.  I just love it.


What a great way to preserve your past and have a beautiful piece of art.

With Grace,

Debra

No Bake Oatmeal Cookies


I had to try these no bake oatmeal cookies.  These are so good.  What I really like, is they are quick and simple and if you have the small ones around they can help!!!

My Daughter has a similar recipe but she uses Rice Krispies instead of the oatmeal but I won't step on her toes, she owns that one in our household.

Ingredients:

1 cup of granulated sugar
2 tablespoons of cocoa
1/2 stick of butter
1/4 cup of milk
1/2 cup of peanut butter
1/2 tablespoon of vanilla
1 1/2 cups of oatmeal


Grab yourself a saucepan and put the sugar, milk, butter and cocoa in.  Turn on the stove to about medium to melt down the butter.  Stir this constantly.  Once the butter is melted, bring it to a boil stirring constantly for about 1 minute.


Remove it from the heat and add the peanut butter and vanilla.  Mix this really well.  If you find the peanut butter isn't softening, just place it on the heating element to get the saucepan to heat up and the peanut butter softens up.


Remove and turn off the heat and add your oatmeal.


Mix really well.   Below is how it should look.


I use a medium size scoop and scoop it right on wax paper.


And then I eat a couple before they have hardened up.  Is that wrong, or what?

Then I quickly put them into the refrigerator, out of sight.

I don't think you have to put them in the refrigerator, but I do or they will be all gone within an hour.


I really like this recipe, because I found that I always have these ingredients on hand and it cures a sweet tooth really fast.  

This made about 14 cookies.  I dare not make more than that at a time.  Double the recipe if you want a bigger batch.  

What a great cookie for the kids to help make for Santa's arrival.  


Enjoy,

Debra


Sunday, November 3, 2013

Felt Ornaments


I spent some time last week cleaning out my craft closet, again.  Please tell me that every one has this issue.  It never stays clean.  I collect and deposit and store, then clean and the process starts all over again.  I did find an ornament felt kit this time.   I had worked two of the ornaments out of the 50.  

This kit has been packed in a box since 1991. I pulled it out and decided I was going to work on these again.  I will admit though, I am not very good with the whip stitch.  It probably isn't all that bad, but it bugs me that I can't space each stitch perfectly.  

This led me to thinking about  the sharpie I bought, and why not use my sharpie and crochet rather than whip stitch the felt pieces together.  I am going to give it a try, and maybe, just maybe I will get this 22 year old project done.  

I am steadily working on the vintage lantern purse pattern.  Almost completed, but not quite ready to share. 

I did promise to be back today, and I am just not going to get the lantern purse done, so I thought I would share some of my projects that have sat in a box possibly longer than some of you have been alive.  

Now that scares me, where did the time go?  

See you tomorrow,

Debra


Saturday, November 2, 2013

Holly Jolly Christmas Gift Card Holder Pattern - Deer, Owl, Santa, Candy Stripes


Holly Jolly Christmas Card/Candy Holder Ornaments PDF Pattern
Buy Now $3.99 USD


I'm still here!!!  Just in my own little world writing patterns and working on vintage patterns.  I had to stop, because I kept coming up with more and more ideas and then I become a recluse and forget there is a world out there.  

I just realized I have sat in this one spot for 3 days and someone texted for lunch.  Food?  What's that?  I said yes of course, and I am running late.  

 I have not bloged in almost week.  Did you miss me?  I missed you.  

I am so excited to to offer this new pattern.  I didn't even have to think about the name.  Holly Jolly is written all over it.  These just bring a big smile to my face.  

I know, I know the reindeer look like bunnies but I love color, just change to brown for a more traditional reindeer look.  

These are fun because you can change color and embellishments and just about incorporate these for any Season or Holiday.  

I hope you like them just as much as I enjoyed designing them.  

I promise, I will be back tomorrow.

Enjoy,

Debra